


Step-by-Step Guide to Planting Stardawg Cannabis Seeds by Discount Cannabis Seeds.
Stardawg cannabis seeds are a popular choice among cannabis seeds enthusiasts for their unique characteristics and robust growth potential. Known for their potent effects and distinctive aroma, Stardawg seeds have gained a reputation in the cannabis community. As we embark on this journey, I will guide you through the essential steps of planting these remarkable seeds, ensuring a successful cultivation experience.
Choosing the right seeds is the first step toward a fruitful harvest. Stardawg seeds, offered by Discount Cannabis Seeds, are renowned for their high germination rate and consistent quality. Whether you're a novice or an experienced grower, these seeds offer an excellent opportunity to cultivate a rewarding crop. In this guide, we'll explore the intricacies of planting Stardawg seeds to help you achieve the best results.
Understanding the lifecycle and growth requirements of Stardawg cannabis is crucial. By the end of this article, you'll have a comprehensive understanding of how to plant, nurture, and harvest these seeds, maximizing their potential and ensuring a bountiful yield. Let's dive into the world of Stardawg cannabis seeds and discover what makes them a standout choice for growers.
Understanding the Characteristics of Stardawg Strain
The Stardawg strain is celebrated for its powerful effects and unique qualities. Originating from the crossing of Chemdawg 4 and Tres Dawg, Stardawg is a Sativa-dominant hybrid that offers both stimulating and relaxing effects. Its high THC content, often ranging between 16% and 22%, makes it a favorite among those seeking a potent experience. The strain is known for its uplifting and euphoric effects, making it ideal for social settings or creative endeavors.
In addition to its effects, Stardawg is recognized for its distinctive aroma and flavor profile. The strain exudes a pungent, earthy scent with notes of diesel and pine, which can be attributed to its rich terpene profile. This unique aroma is part of what makes Stardawg so appealing to cannabis connoisseurs. Understanding these characteristics will help you appreciate the nuances of this strain as you cultivate your plants.
The Stardawg strain is also known for its resilience and adaptability, making it suitable for both indoor and outdoor growing environments. Its robust nature allows it to thrive in various conditions, provided it receives the right care and nutrients. This versatility is one of the reasons why Stardawg continues to be a popular choice for growers looking to cultivate a high-quality cannabis crop with a distinctive profile.
Preparing for Planting Stardawg Cannabis Seeds
Preparation is a critical step in the successful cultivation of Stardawg cannabis seeds. Before planting, it's essential to gather all necessary supplies and create an optimal growing environment. Start by selecting a suitable growing medium, such as soil, coco coir, or hydroponics, depending on your preferences and experience level. Each medium has its advantages, and choosing the right one will set the foundation for healthy plant growth.
Next, ensure you have the necessary equipment for maintaining the ideal growing conditions. This includes grow lights, fans, and ventilation systems for indoor setups, or choosing an appropriate outdoor location with adequate sunlight and protection from harsh weather conditions. Monitoring tools such as thermometers and hygrometers will help you keep track of temperature and humidity levels, which are vital for the healthy development of your plants.
Finally, consider the nutrients and supplements you'll need to support your plants' growth. Stardawg cannabis plants require a balanced diet of essential nutrients, including nitrogen, phosphorus, and potassium, along with micronutrients like calcium and magnesium. Stock up on these supplies before planting to ensure your plants have all they need to thrive throughout their lifecycle.
Step-by-Step Guide to Planting Stardawg Cannabis Seeds.
Planting Stardawg cannabis seeds requires attention to detail and a systematic approach. Follow these steps to ensure a successful start to your cannabis growing journey:
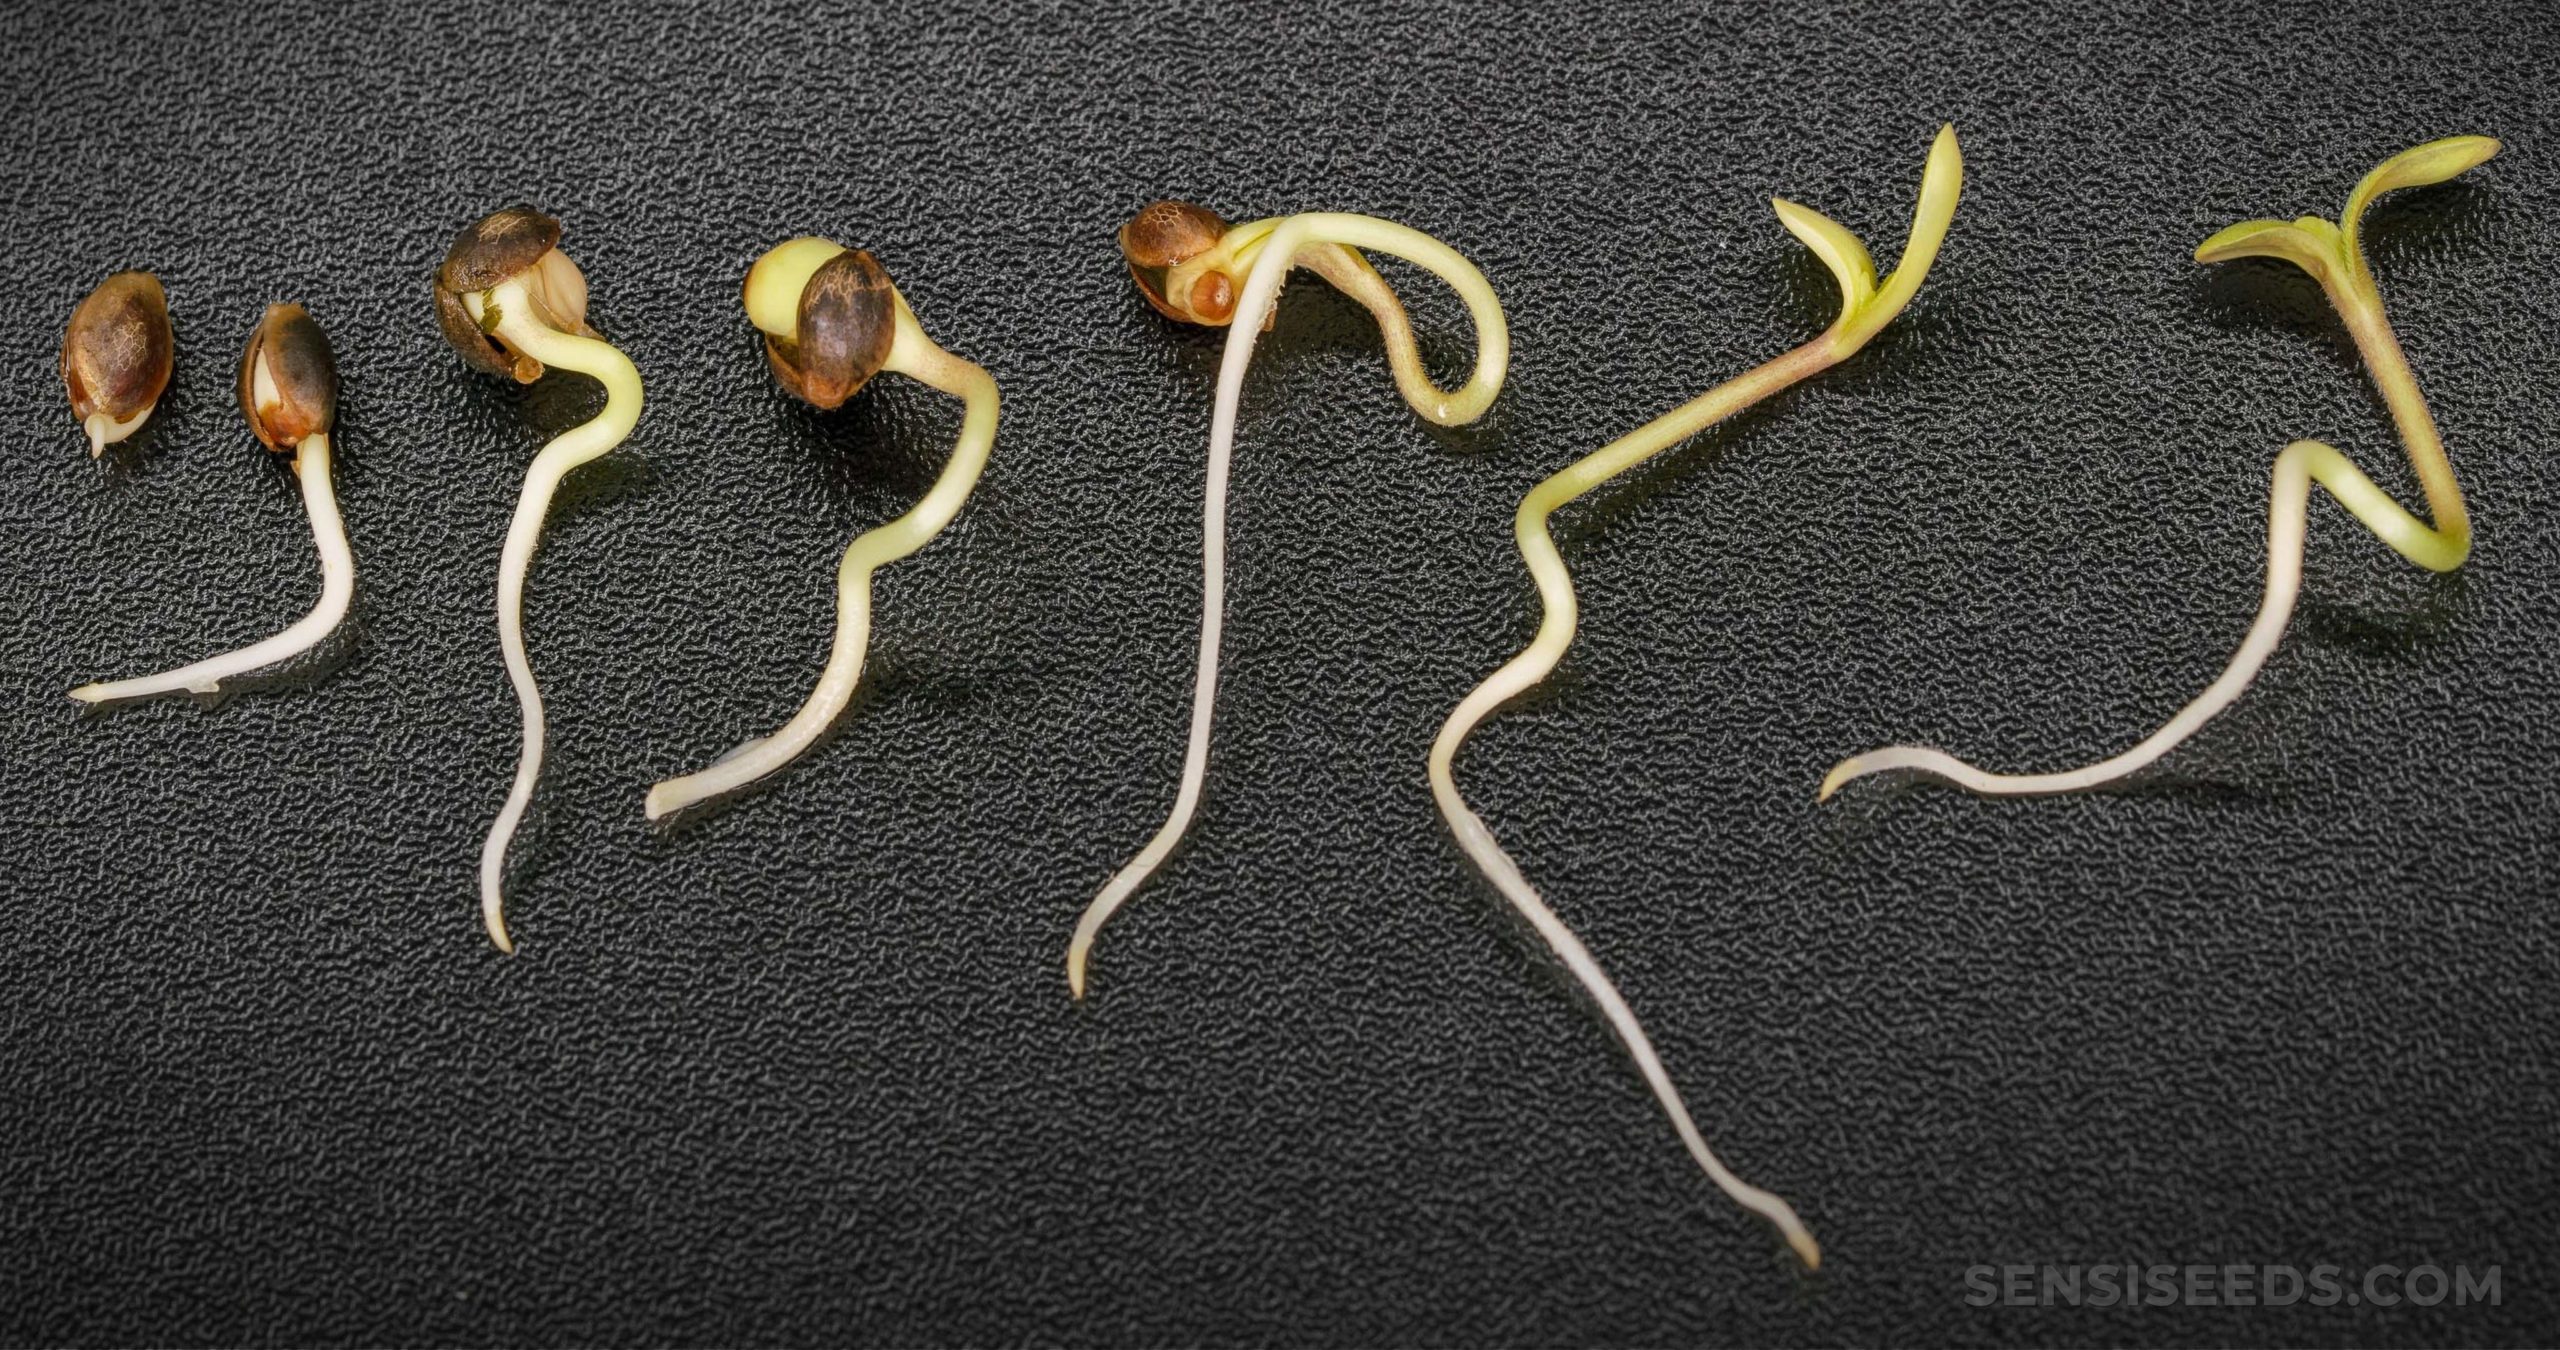
- Germination: Begin by germinating your Stardawg seeds. This can be done using the paper towel method, where seeds are placed between damp paper towels and kept in a warm, dark place. Within a few days, the seeds will sprout roots, indicating they are ready for planting.
- Planting: Once the seeds have germinated, carefully plant them in your chosen growing medium. Ensure the root is facing downwards and cover the seed lightly with soil or the medium of your choice. Maintain a consistent moisture level to support the seedling's growth.
- Lighting and Temperature: Provide your seedlings with the optimal lighting conditions. If growing indoors, use grow lights set to a schedule of 18 hours of light and 6 hours of darkness. Keep the temperature between 70-85°F (20-30°C) to promote healthy growth.
- Watering: Water your plants regularly, ensuring the growing medium remains moist but not waterlogged. Overwatering can lead to root rot, so it's crucial to maintain the right balance.
- Monitoring: Keep a close eye on your plants as they grow, looking out for any signs of nutrient deficiencies or pests. Early detection and intervention are key to maintaining healthy plants.
By following these steps, you'll set the stage for a successful cultivation process, ensuring your Stardawg cannabis plants grow strong and healthy.
Ideal Growing Conditions for Stardawg Cannabis Seeds.
Creating the perfect growing environment is crucial for the success of your Stardawg cannabis seeds plants. These plants thrive in specific conditions, and providing them with the right environment will enhance their growth and yield.
Key Growing Conditions:
- Temperature: Maintain a consistent temperature range of 70-85°F (20-30°C) during the day and slightly cooler at night.
- Humidity: Keep humidity levels between 40% and 60% during the vegetative stage, and lower it to 30%-50% during flowering to prevent mold and mildew.
- Lighting: Ensure your plants receive adequate light, whether from natural sunlight or grow lights. A schedule of 18 hours of light and 6 hours of darkness is ideal during the vegetative stage, transitioning to 12 hours of light and 12 hours of darkness during flowering.
- Air Circulation: Good air circulation is vital for healthy plant growth. Use fans to provide a gentle breeze and prevent stagnant air, reducing the risk of mold and pests.
By maintaining these conditions, you'll create an environment that supports robust growth and maximizes the potential of your Stardawg cannabis plants.
Nutrients and Care for Stardawg Cannabis Plants
Proper nutrition and care are essential for the healthy development of Stardawg cannabis plants. Providing the right balance of nutrients will ensure your plants grow strong and produce a high-quality harvest.
Nutrient Requirements:
- Macronutrients: Stardawg plants require a balanced diet of primary nutrients, including:
- Nitrogen (N): Essential for vegetative growth and leaf development.
- Phosphorus (P): Important for root development and flowering.
- Potassium (K): Supports overall plant health and disease resistance.
- Micronutrients: In addition to macronutrients, your plants will benefit from trace elements like calcium, magnesium, and sulfur, which play crucial roles in plant metabolism and structure.
Care Tips:
- Regular Feeding: Use a high-quality cannabis seeds fertilizer to provide your plants with the necessary nutrients. Follow the manufacturer's instructions for dosage and frequency to avoid nutrient burn.
- Water Quality: Ensure your plants receive clean, pH-balanced water. The ideal pH range for cannabis is between 6.0 and 7.0 in soil and 5.5 to 6.5 in hydroponic systems.
- Pest and Disease Management: Monitor your plants regularly for signs of pests or diseases. Implement preventative measures, such as introducing beneficial insects or using organic pest control products, to protect your plants.
By providing the right nutrients and care, you'll support the healthy growth of your Stardawg cannabis plants, leading to a successful harvest.
Common Mistakes to Avoid When Planting Stardawg
Avoiding common pitfalls is crucial to the success of your Stardawg cannabis cultivation. Here are some mistakes to watch out for and tips on how to prevent them:
- Overwatering: One of the most common errors is overwatering your plants. Excess water can lead to root rot and other issues. Ensure the growing medium is allowed to dry out between waterings to maintain healthy roots.
- Nutrient Overload: Overfeeding your plants can cause nutrient burn, resulting in damaged leaves and stunted growth. Stick to the recommended feeding schedule and adjust based on your plants' needs.
- Poor Lighting: Insufficient or excessive light can hinder your plants' development. Ensure your plants receive the right amount of light by adjusting the distance and intensity of your grow lights.
- Neglecting pH Levels: Maintaining the correct pH level is crucial for nutrient absorption. Regularly test and adjust the pH of your water and nutrient solution to prevent nutrient lockout.
By being aware of these common mistakes and taking preventive measures, you'll increase your chances of a successful and bountiful harvest.
Harvesting and Curing Stardawg Cannabis
The final stages of your Stardawg cannabis cultivation journey involve harvesting and curing your plants. These steps are vital for preserving the potency and flavor of your buds.
Harvesting:
- Timing: Knowing when to harvest is crucial. Monitor the trichomes on your buds using a magnifying glass. Harvest when they transition from clear to milky white with a hint of amber for optimal potency.
- Technique: Use sharp scissors or pruning shears to cut the branches and trim away excess leaves. Handle the buds gently to avoid damaging the delicate trichomes.
Curing:
- Drying: Hang the trimmed branches in a dark, well-ventilated space with a temperature of 60-70°F (15-21°C) and humidity around 50%. Allow the buds to dry for 7-10 days until they feel dry to the touch.
- Curing: Place the dried buds in airtight glass jars and store them in a cool, dark place. Open the jars daily for the first week to allow moisture to escape, then reduce the frequency over the next few weeks. Curing can take 2-4 weeks or longer for enhanced flavor and aroma.
Proper harvesting and curing will enhance the quality of your Stardawg cannabis, ensuring a flavorful and potent end product.
Frequently Asked Questions about Stardawg Cannabis Seeds
Here are some common questions growers have about Stardawg cannabis seeds, along with answers to help you on your cultivation journey:
FAQs:
Q1: How long does it take for Stardawg seeds to germinate?
A: Stardawg seeds typically take 24-72 hours to germinate using the paper towel method.
Q2: Can Stardawg be grown indoors and outdoors?
A: Yes, Stardawg is versatile and can be grown in both indoor and outdoor environments, provided the growing conditions are suitable.
Q3: What is the average yield of Stardawg plants?
A: The yield can vary based on growing conditions and care, but Stardawg plants generally produce a moderate to high yield, averaging around 400-500 grams per square meter indoors.
Q4: How tall do Stardawg plants grow?
A: Stardawg plants can reach heights of 3 to 4 feet indoors and may grow taller outdoors, depending on the space and conditions.
These answers should provide clarity on some of the most common inquiries about Stardawg cannabis seeds, helping you make informed decisions throughout your cultivation process.
Conclusion and Final Tips
Cultivating Stardawg cannabis seeds can be a rewarding experience, offering a unique strain that stands out for its potency, aroma, and resilience. By understanding the characteristics of Stardawg and following the step-by-step guide provided in this article, you'll set yourself up for a successful growing journey.
Remember to maintain optimal growing conditions, provide the right nutrients, and avoid common mistakes to ensure your plants thrive. As you approach the final stages of harvesting and curing, take the time to ensure your buds are dried and cured correctly for the best quality.
For those eager to embark on their Stardawg cultivation journey, consider purchasing your seeds from Discount Cannabis Seeds. With a reputation for quality and reliability, they offer a wide selection of seeds to kickstart your growing adventure. Start your journey today and enjoy the fruits of your labor with a successful Stardawg cannabis harvest.
Ready to begin your Stardawg cultivation journey? Visit Discount Cannabis Seeds to browse their selection and take the first step towards a thriving cannabis garden!